Pages

Featured Post

What Was I Thinking!!

 I have been at this a long time! 20 years in fact. I have had a lot of fun over the years and had my share of recognition when this medium ...

Showing posts with label art. Show all posts

Pancakes and Booze in Raleigh - Tonight!!!!

I am so excited to be a vendor at Pancakes and Booze in Raleigh at the Lincoln Theater tonight!!!


There will be lots of artist there, lots of local vendors there, live music and pancakes and booze!!

Here is a blurb from their site
"As you may have guessed, we are an art show, but we are not your typical art gallery. Since 2009 we've been filling the best venues in over 30 cities around the world with your favorite local artists, photographers, bands, and DJ's. We focus on keeping the work on display local and original to help artists of all types sell their work while they're still alive (why does it take dying to gain recognition?). Each show usually features between 50-150 local artisans, a unique lineup of live musicians and/or DJs, live painting, body painting, along with other forms of entertainment. Oh, and of course PANCAKES!
We seek to bring the art community and those outside the community together by creating an upbeat art show that appeals to the masses. Through the shows we create an environment where artists, potential buyers, and pancake fanatics alike can make connections with several different types of people within their own communities." 

I am debuting my new fabric wrapped bracelets tonight!
Come on out and see what is happening at Pancakes and Booze! It will be fun!!!

And as always, Be peaceful, Be kind. 
Remember to explore, create, dream, imagine and discover!


All of my jewelry creations are based on the metaphysical properties of the stones or the colors that are incorporated. Jewelry should be a window to our soul, a protector of our emotions and a companion to our spirit. All of my other creations come directly from my heart in hopes they touch yours as well. Celebrate yourself with healing jewelry, and other gift ideas made with love!

Changing As I Grow

Time to give my blog a facelift of sorts.

Since I started this blog a million years ago, I have changed, my work has changed, my interests have changed, and all of these while changing have grown as well.

Change is good. It keeps you current and fresh.

While I still am jewelry for your soul, creating wearable art using the metaphysical properties of stones, I am also an artist in acrylics and mixed media. Exploring new mediums to display my work with and on. I am on a spiritual journey to become the greatest version of myself. All of these things and more will be shared on my blog.

Will you go on this journey with me?

I would love to see you there!

And as always, Be peaceful, Be kind. 
Remember to explore, create, dream, imagine and discover!

Anatomy of a Painting - Tie Dye Garden


I wanted to do something bright, something floral and still abstract. I work alot with blues, and for once wanted to have a painting with no blue in it. 

I laid out the canvas for a tryptic style layout. I used ALOT of paint because I knew I was going to loose a lot of it in the process. Now think of a bug crawling thru a flower garden in full bloom. As you look around, what would all that glorious color look like? That is where we start.


We are a bug in a garden and have an up close and personal view of a bloom, now lets move forward shall we?
Water - tons of water, this is where I am loosing paint. I spray, spray, spray the canvas and then tilt it around slightly for all the colors to run. This gives is a tie dye effect - cause you know I can't leave the house without at least one piece of tie dye on :)


This is going to take a while to dry, so I am really looking into this piece, taking the vision further. It needs depth, it needs some shadows, it needs a darker color. 
Lets go for the blue :)


There is still a lot of water on the canvas, so the blue/green begins to 'melt' into the pattern, PERFECT! I don't tilt it around, I just let it do it's thing. 


As it dries, you can see how the blue started to crawl thru the painting, making it seem alive. 


Now that the painting is fully dry, there is still some need for depth, for definition. On the parts of the canvas that had little to no paint, I used a black color pencil to shade in areas.  That helps to bring the color forward. Then to help define the 'petals' of the flower, I used a sharpie and made random lines, tracing the 'petals'
Now you can see them side by side, finished, as I had envisioned them!


Items used, acrylic paint, color pencils, sharpies.


And as always, Be peaceful, Be kind. 
Remember to explore, create, dream, imagine and discover!


Flood the Streets with ART II!!!!!!!

While browsing Facebook, I found a really great movement that is happening. Flood the Streets with Art. 
Brain child of Scott Wong, that artists everywhere are helping to nurturer into a living, loving beautiful entity. It is a peaceful, giving movement to promote artists everywhere.


How do you do it? Make your art, tag your art as free, leave your art for someone to find it.

To quote Scott Wong - "Here in the United States of America, we celebrate Thanksgiving Day on Thursday, Nov. 27th. We spend the day with family, friends and loved ones giving thanks for everything in our life we have to be thankful for.

On the following day a.k.a. BLACK FRIDAY (the day after we've given thanks for everything we have in life), we rush out in an uncivilized manner trampling complete strangers to death so we can buy a DVD player for five bucks. This is meant to be tongue-in-cheek, but you get the gist of it."


I am not saying to stop shopping at the local chains near you, people who work their need their jobs to support their family. Just be choosy in your gift purchases. Make them count. Buy locally to support your local businesses, to support the arts in your community, to give a gift that is unique and represents the recipient, instead of giving that gift out of obligation.

Want to find out more?  Join the group on Facebook, see what everyone will be making for the "Flood"

Be part of the movement  - I am :)

Acrylic Painting - Cosmic Chrysanthemum

I do love working with these colors! And I do have an obvious theme, I am inspired by the universe. In many many ways.

This was a fun project. I had some old cabinet doors in the shed. That got me to thinking.....

Tape off the door - now I have a canvas, and a built in frame.

Gesso, and lots of it - give it texture


Layers

Layers

Layers!!!!

I beat the outside of the door with a hammer, schmered on some black paint, wiped it off, and instant art in an instant frame!!!


Creative Diversion

I don't know one artistic/crafty person that only does just one thing. They all dabble in several creative mediums.

I am no exception.

Lately I have felt the need to paint. I had talked to my brother who explained one of his techniques to me that he teaches in his art class.

Cut a piece of board, or use a canvas board. Schmere a mess of spackle on the board and use different objects to cut designs into the spackle. Let it dry, seal it, and paint!!!! My brother used acrylic paints for his spackle creations, I used the tubes of craft acrylic paint, to see if I liked it, before I invested in some good quality acrylic paint.

Welp - guess what.... I love this!! This is a great form of expression and good therapy too. You can't make a mistake. If you don't like it, paint over it. How cool is that! My brother gifted me with a box full of paint, and I can't wait to start exploring more.


What art do you like to or have you wanted to explore?


p.s. - i'll be posting a how to on this technique next week :)

Speaking of..

When I finally get it down, and understand all the geometry to it, I will take the wrapping world by storm. In the meantime I like to play around.


KoKo Peli


Cleo's Star

Rings & Things Choker Challenge - 5

I really have had the best time with this challenge. I want to thank Dave at Rings and Things for approaching me with their blogger outreach. It has pushed me into new areas of design that I though were not possible. I can't believe how much it has helped me grow in thought process, and design mechanics in such a short time - Thanks again!!!

I have had this idea rolling around in my head for several days. This morning I sat down to try and bring it out. I documented the process so you could see how it is done.

Used in this challenge:
Rings & Things part number #52-030-18-05 - Choker, Cable, 18" SmoothEnd (Red/White)

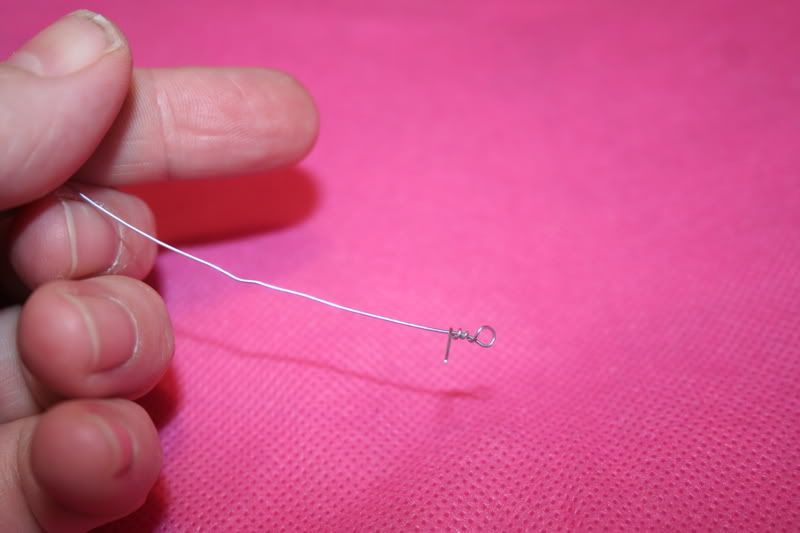
This choker cable has a barrel screw clasp - very exciting. That allows me to create a bigger bolder design and be confident that the clasp will stay secure. I went through my craft room and gathered up some random goodness of black/red/gray/white. Piled it on the kitchen table and began to create. I used a base metal wire - approx 26 ga from the looks of it - cut a good length for wrapping - 4 inches - and made a wire wrapped loop at the end.


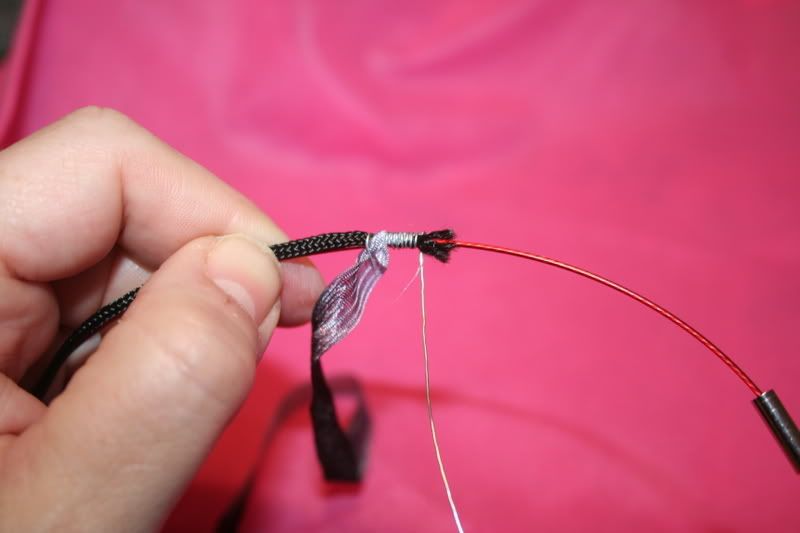
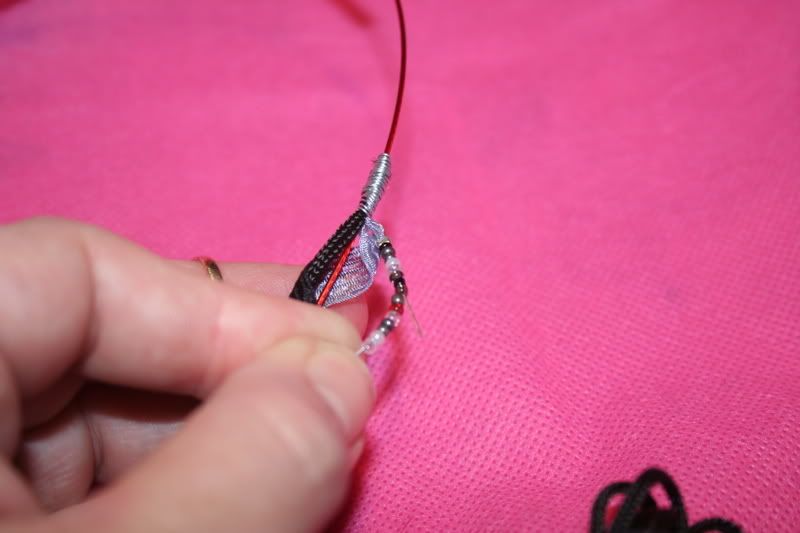
Cut a lenght of ribbon and cording to attach to the cable - 12 inches or so each. Pinch the ribbon and cord onto the cable and secure it with your fingers. Use the wire wrapped loop as the base of the wrap, and start wrapping up the cable. Keep your wraps close and tight.


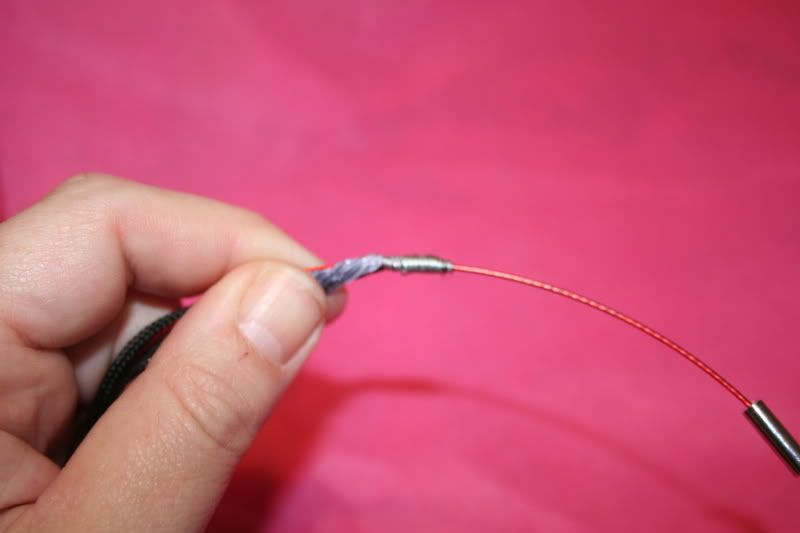
Give the wrap a bit of a 'mash' to help tighten it up.


Do an 'over and under' around the cable with the ribbon and cord. It doesn't have to be perfect.


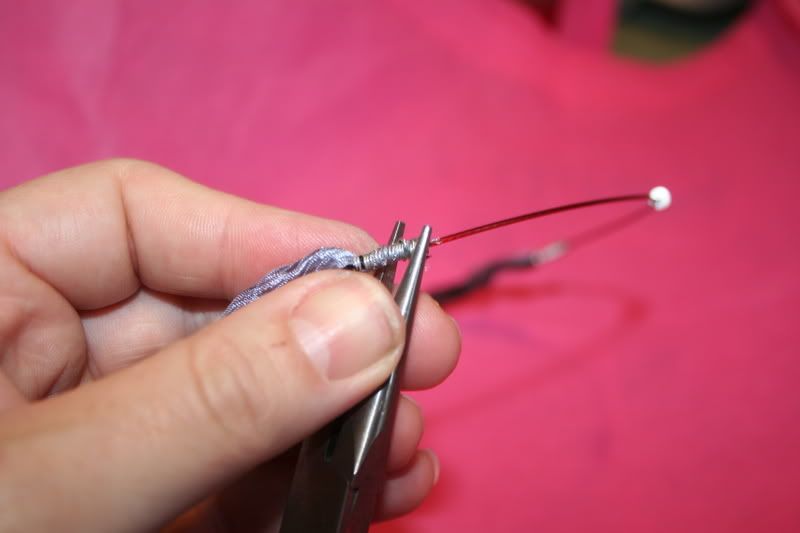
Secure the other end with the same wrapping style that you used to start it.

Begin stringing your design. Keep the design random an fun. This will be the focal of this piece. The beaded section should hang at the same level as the choker cable. It will be heavy and want to drape, don't make it too long. Beadalon is the beading wire I used for this example. Use a crimp bead and attach the beading wire to the wire wrapped loop at the base of the wrap that was used to secure the ribbon and cable. Run the tail of the beading wire back thru the beads to help anchor it, and then trim the excess.


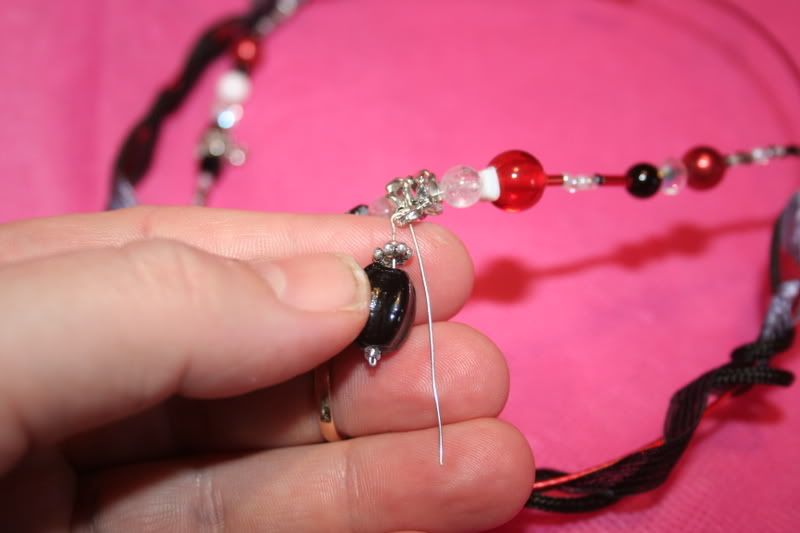
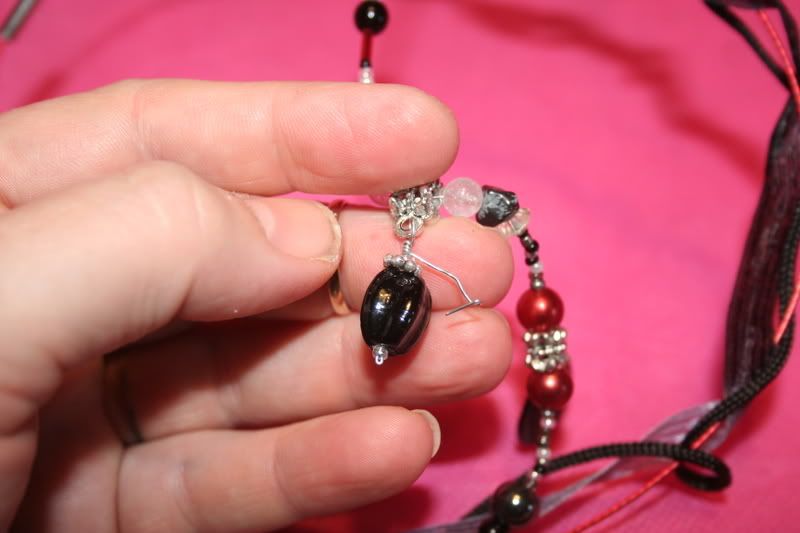
In the search for some fun beads, I had some pewter spacer beads that have charm links attached to them. I also added them randomly thru the design to add charms to the look.


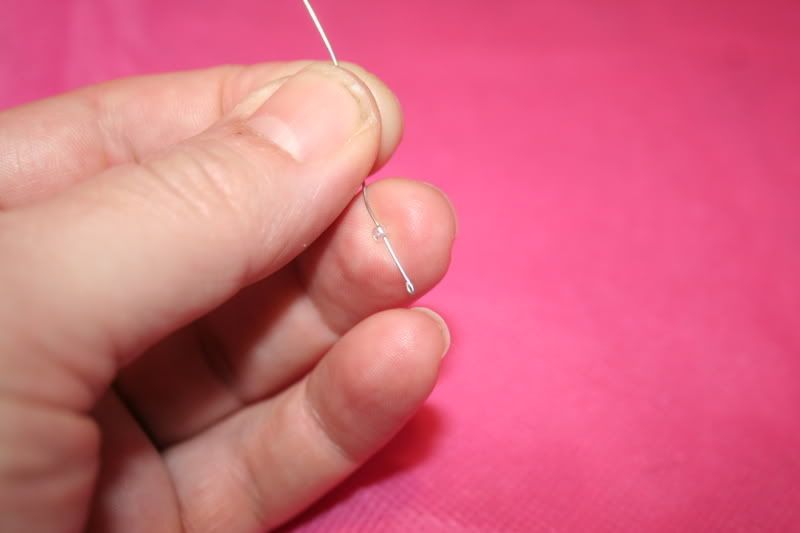
Cut a 2" piece of the wire, and fold the end back onto itself to create a head pin.

Decorate the head pin with your beads and make a bend at the top to push thru the charm loop on your spacer bead.

Finish with a basic wrap to secure the charm to the link.


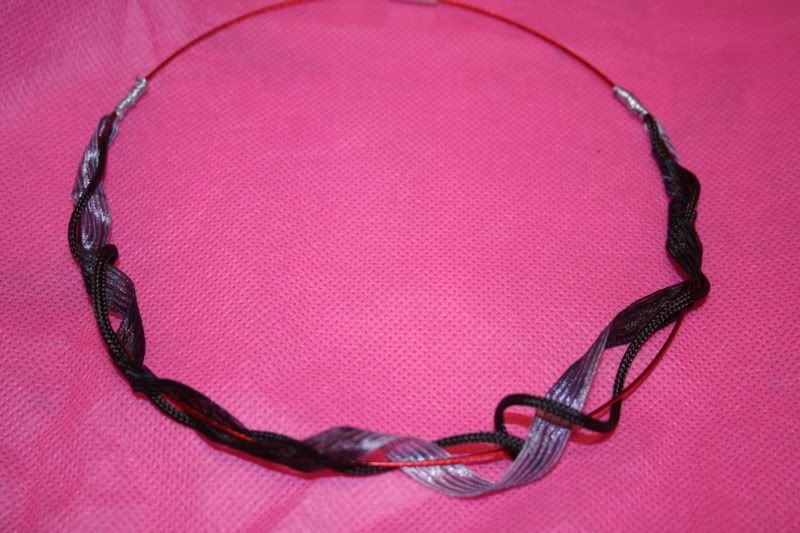
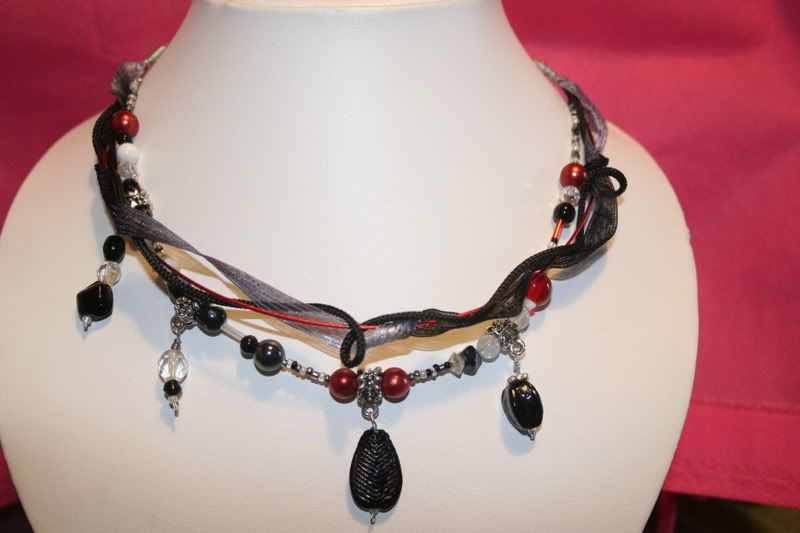
Here ya have it kids - The finished product. I intentionelly put it off center - that is how I see the world :)

Ya Ya


Finding inspiration

I find inspriation in everything around me. Whether I use the inspiration, that is another story. I keep a notepad with me so I can jot down design ideas, or make note of an interesting texture or color I see in passing. I have also been known to clip pictures and tuck them away to use another day. Soon my little notebook becomes a weatlh of idea referals when my idea pool is empty.

Another great source of inspiration are Soul Cards . A beautiful collection of prints by artist Deborah Koff-Chapin. The cards have no meaning - they are intended to inspire you. I have gifted several of my 'artist' friends these cards to have for those times when the creativity just won't flow.

One exercise I use after I have had a low point in creativity, is a recreate project. I use an image or an item and try to design a piece that imitates it, as opposed to being inspired by. I am a firm believer that creativity spawns creativity. This being said, more times than not, as I am doing this exercise, I have an idea for something else. I keep an inventory of base metal findings, mismatched jewlery, and odds and ends for these practice sessions. I do this as I don't want to waste sterling on an item that I may tear apart two or three times trying to get it right.

In the dreary throws of winter, I love looking at pictures of flowers in bloom. I takes me to a place in my mind where I want to be. Planting flowers and strolling through my yard enjoying them. Below is an image of the elder bloom, and the bracelet created from it.

elder bloom inspriation

elder bloom bracelet

Getting your name out there

I was pah-roosing around on craigslist (as I normally do when bored at work) looking for something interesting, when a post caught my eye - donations for an auction - more precisely - art donations for an auction.

This got me thinking, wrinkled brow and all.


It has to start somewhere.

Being in the craft/art business, one of the hardest things I have found, is to get your name out there. When you have this kind of business you don't always have startup capital - is more of a "pay as you go" plan. Cut costs where you can, forgoing business cards for your name and number scratched on a napkin when someone compliments what you are wearing. Printing up small flyers and adding them to the local community boards, spamming your friends with 'pass this along for me' messages - It really is a word of mouth campaign to get started.

When I first started I was desperate to get my name out there, to get noticed. I had to get my foot in the door, and secure me a corner at a local consignment store. If I was in that brick and mortor, I knew people could see me. Money was my obstacle - "How can I get people to take me seriously and also to see my work on this budget?"

Donate.

Donating items to local charity organization for auctions is a GREAT way to get your name out there. Not only are people seeing your work, they see your business card (even if you have to go to Staples, buy the paper and print your own) AND you are typically invited to attend. At the auction, you get a night out, you get to dress up, you can 'hob nob' (do ppl still use that term?) with other auction goers. You get to shake hands, you get to not only promote your items, but network and met other people in the area and make great business connections.

*insert sage widsom*
Sharing interests with others, creates interest from others.

So kids, whether it is an item, or a service, more than likely it is needed by someone, and can be auctioned off for a great purpose - plus you get a tax deduction!!!!

*drops two cents*

someone can pick it up or drop two more!!!!

Choker cable challenge

Chapter two. Bola Faux

I thought it would be fun to create an illustion of a bola (also known as a bolo) tie. I brought the ends of the leather together, made a pinch loop at the bend in the middle, and pushed the tails through the loop, attaching it to the cable. I then made a basic wire loop and attached it to the leather. This gives the look of the bola. Finally, I added embelishments to the ends and a turqoise teardrop. No self respecting bola can be without turquoise!

One thing I would recommend, if you are using heavy stones for the focal, use the choker cable that has the barrel screw connector instead of the magnetic. The magnectic connectors are very conveinent, but cannot support a lot of weight.

Rings and Things inventory number for the cable used in this piece is:
#52-52-090-20-1 Choker, Magnet, Cable, 1mm, 20"


This is a fun piece to wear with a scoop neck tee.

choker challenge

Or under the collar of your button-down shirt for that true bola look.

choker challenge

To be continued......

The Challenge is Set!

I love a good challenge, and thanks to Rings and Things , I have one.

This is an ongoing project, so make sure to use the RSS feed at the left of the page so you don't miss out on any of the newest design updates!

Challenge 1: Choker cables.

The choker cables in these images have magnetic clasps. The clasp feels to be secure, but I think with a heavy pendant I would worry about it coming free. I like the idea of the barrel screw clasp better.

First thought with a choker cable is pendant. I love the cable, it holds its shape - unlike a chain or leather thong that drapes to the weight of the pendant. With a crew neck or scoop neck t-shirt, these cables keep the focus of the pendant up at your neck line. Truly fabulous. I have tons of pendants because I am a pendant wearer. I normally have them on a leather thong and in different links, depending on the type of shirt i am wearing. I also have a tendency to wear a shorter style necklace - and the choker cable is a great fit for that. (I feel a change coming on.) The clasp is small enough the bale slides over it easily giving me so much versatility. All I have to do is decide which pendant for which mood! I am impressed at the cable for keeping it shape with four pendants hanging from it!

pendants on choker cable

Pictured in this image - #52-000-15-9 Choker, Steel, Cable, 1mm, 15" (Black/White Clasp)

"That is too easy, TIsh!" I hear you say and, yes, I agree. What fun is a challenge if the outcome is predictable?

What can I do to create something different, w/o just sliding beads onto the cable?

*think* *think* *think*

I poked through my box of "glorious randomness" and found these fun vintage Czech glass beads. I chose these as the focal using an eye pin to secure them to the choker cable. The cable does slide around some, and it works the clasp toward the front. I wanted the design more stable, so I wrapped a copper wire around the cable and threaded on amethyst chips for an acent.

Here is the first, of five.

Restless Wend

choker challenge

Pictured in this image - #52-001-18-9 Choker, Steel, Cable, 1mm, 18" (Black/Gold Clasp)

Am wearing this one today, and have already been complimented!

proof in da puddin
To be continued......

My Muse

Deep down, you and I can't be that different. How we gain our inspiraiton, express our emotions into our craft, or how we dig through our supplies to find just the right piece. I felt that you would have an appreciation of the effort required to create such beauty. I thought I would throw caution to the wind and bring a real side of me to you.

My Muse


The weather has been cold, and my muse has packed up and moved on south. This time of year is the worst for me and finding my creative vein. I just want to curl up with a good book and wait for spring. I sit at my craft table looking for inspiration, finding little and forced to create from the chaos that is my life.

I use to have the spare bedroom of the house set up as my crafting domain. I could close the door, turn on my music and get lost for hours. Now, I have been displaced - maybe that is it. Due to the life of chaos that I lead, add in a troubled nephew, and a jilted best friend with no where to go, I have no room. My spare rooms are now in use, and I am downstairs, in the wide open, with no doors, and no privacy. I think my muse, the fussy diva that she is, liked the coziness and the privacy of the spare room.

Across my craft tables, the cats now sleep. Beads and baubles getting stuck between their toes, and dropped throughout the house as they preen. The dogs chase the cats thru the house in good humor, ending up in a spray of supplies across the floor........ *sigh*

Our show schedules have slowed to a crawl, one here, one there. I sit at my table and stare, slurping on my coffee and trying to justify why i am not organized, or why I am not producing new product. I look around me, trying to make sence of the lack of organization, look out the window at the dim summer sun and shudder.

I have attached an image of my craft room and I have to laugh, for what would I gain by crying? Messy mascara :)


Update cookies preferences